
Garage Door Side Seal: Ultimate Guide for Best Protection

A garage door side seal or weatherstripping, is a special seal made to bridge the gaps between the sides of the garage door and its frame which ensures nothing slips through. These are typically crafted from materials like rubber, vinyl, or brush-like bristles. Depending on the design, they can compress when the door shuts to offer a tight seal and rebound when it opens. There are various types, including retainers with seals where the retainer attaches to the door and the seal locks into it, and integrated seals which are directly affixed to the door edges, either through glue or nails.
Why Do You Need One?
A garage door side seal acts as an insulator, preventing the chilly drafts of winter or the sweltering heat of summer from entering, making the garage more comfortable and even cutting down on energy bills. The seal also acts as a barrier against the elements, like rain, snow, or dust, especially important if your garage houses sensitive items. It ensures pests, whether they be rodents or insects, won’t infiltrate your space. Just as one wouldn’t leave windows slightly open in their home, similar care should be afforded to the garage with a side seal.
Types of Garage Door Side Seals
Garage door side seals come in various materials and designs. While all types serve to keep out unwanted elements, the choice of material can make a significant difference based on specific challenges. Here’s a more detailed look:
Brush Seals
Brush seals are typically made of fine filaments, like nylon or polypropylene. They’re known for their adaptability, as they easily conform to uneven surfaces. This makes them a great fit for older garage doors that might have seen some wear over the years. Their durable nature ensures they resist most chemicals, UV rays, and moisture. Plus, their design effectively keeps small pests at bay.
Recommendation: Frost King C35PH Plastic Brush Door Sweep
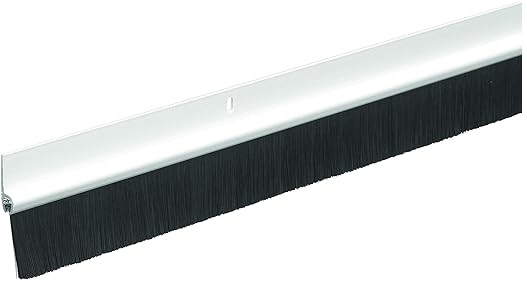
For brush seals, I recommend Frost King C35PH Plastic Brush Door Sweep available on Amazon. The product boasts excellent reviews, with many users appreciating its durability and ease of installation. What caught my eye is its high-density brush design, which provides an efficient barrier against dirt, pests, and even the elements.
Vinyl Seals
Vinyl seals are flexible strips that fit snugly against the sides of your garage door. These seals are a great choice for weather resistance. They stand up well to both cold and heat, ensuring they stay functional throughout the seasons. They’re also typically more budget-friendly and require minimal maintenance.
Recommendation: M-D Building Products 03822 Durable Garage Door Seal
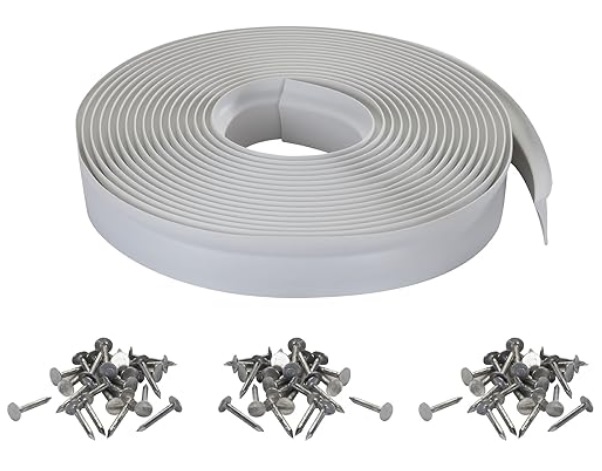
On Amazon, the M-D Building Products 03822 Durable Garage Door Seal stands out. Users often praise its effectiveness in keeping out drafts and water. It’s easy to install and, given its premium vinyl construction, offers longevity and value for money.
Rubber Seals
Rubber seals, especially those made from synthetic rubber like EPDM, are an excellent choice. They provide a top-notch barrier against the elements, with their elasticity ensuring no rain, snow, or wind slips through. Their longevity is a significant plus, resisting ozone, UV rays, and temperature extremes. And if you’re someone who values a bit of quiet, rubber seals also offer some soundproofing.
Recommendation: Xcluder X2 Rodent Proof Sectional Door Seal Kit
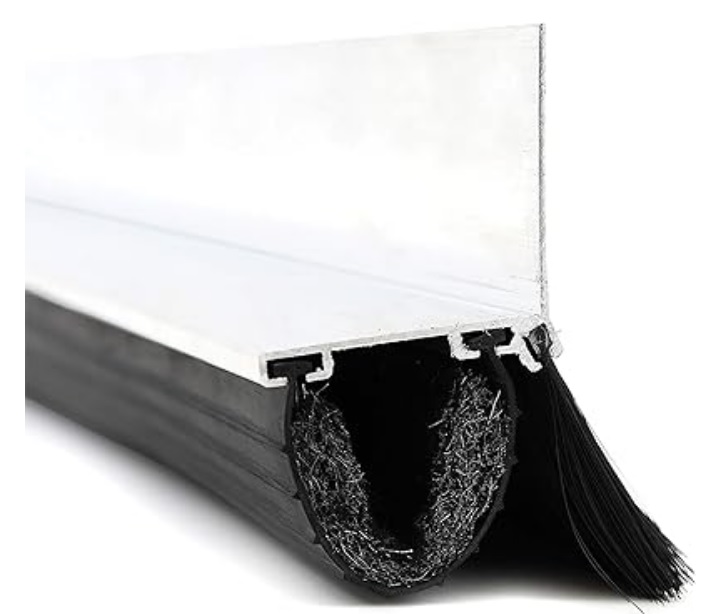
For rubber seals, the Xcluder X2 Rodent Proof Sectional Door Seal Kit from Amazon is a top pick. Its high ratings are well-earned, with many customers highlighting its effectiveness against pests, especially rodents. The product’s robust build ensures it stands up to daily wear and tear, making it a worthy investment for your garage.
Installation Tips
Preparing Your Door
Before diving into the installation, it’s important to prepare the door to make sure the seal adheres properly and provides an effective barrier:
1. Clean the Surface: Begin by cleaning the sides of your garage door. Remove any dirt, grease, or old adhesive. A mixture of mild detergent and water works well for this. Wipe the surface dry once cleaned.
2. Inspect for Damage: Look for any damages or irregularities on the door surface. If there are dents or warps, you might want to address these first. A flat, smooth surface ensures the seal fits snugly.
3. Gather Necessary Tools: Gather the tools you’ll need. This could include scissors or a utility knife for cutting the seal, nails or screws for attaching it, and possibly adhesive if required by the product.
Step-by-Step Guide
Here’s a simple guide to help you through the installation process:
1. Measure Twice: Measure the length of your garage door sides to determine how much seal material you’ll need. It’s always a good rule of thumb to measure twice to avoid any mistakes.
2. Cut the Seal: Using your measurements, cut the side seal material to the required length. Always cut a little extra; you can trim any excess later.
3. Test Fit: Before securing the seal, do a test fit by placing the seal along the door’s side to ensure it fits properly.
4. Secure the Seal: Depending on the type of seal:
For integrated seals, you might need to peel off a backing and press the adhesive side onto the door.
For seals that come with retainers, you’ll first attach the retainer to the door using screws or nails, and then slide or snap the seal into the retainer.
5. Check the Fit: Once installed, slowly close and open the garage door to ensure the seal compresses and rebounds correctly without causing any hindrance.
6. Trim Excess: If there’s any excess seal material protruding, carefully trim it off for a neat finish.
7. Test for Gaps: To ensure there are no gaps, you can use a flashlight in the dark. Shine it from the inside of the garage along the edges. If you see any light seeping out, that indicates a gap, and you might need to adjust the seal accordingly.
Maintenance and Care
Cleaning
Over time, garage door side seals can accumulate dirt, debris, and in some cases, even mold or mildew. Regular cleaning helps to keep them in optimal condition. Here’s how to go about it:
Brush seals: A simple dusting or gentle brushing can remove most of the accumulated dirt. If they’re very dirty, consider using a mild detergent diluted in water and gently scrubbing the bristles. Rinse with clean water and let them dry naturally.
Vinyl and Rubber seals: These generally have a smoother surface. Wipe them down with a damp cloth. If they’ve gathered more stubborn grime, a gentle cleaner or a mix of water and mild detergent can help. After cleaning, wipe the seals with a dry cloth to prevent any water buildup.
Replacement
Even with meticulous care, garage door side seals will wear out over time. Here’s when and how to consider replacements:
Signs of Wear: If your seal starts to show signs of wear, such as cracking, splitting, or even sections of it coming off, it might need replacing soon.
Decreased Efficiency: If you begin noticing drafts, moisture, or even small pests making their way into your garage, your seal might not be performing its job anymore.
Age: Even if they look okay, older seals might lose their flexibility or adherence. It’s a good idea to inspect your seals annually and consider replacing them every few years.
Conclusion
Garage door side seals are essential components that serve multiple functions, from insulating your garage and saving on energy bills to protecting the space from pests and the elements. With various types available, including brush, vinyl, and rubber seals, there’s a suitable choice for every garage’s unique needs. Proper installation ensures maximum effectiveness, and regular maintenance can prolong the seal’s lifespan. Investing time and effort into selecting and caring for your garage door side seal ensures your garage remains in prime condition for years.
FAQs
1. What is the primary function of a garage door side seal?
It serves to insulate the garage, protect it from external elements like water and pests, and enhance energy efficiency.
2. How often should garage door side seals be replaced?
While it varies depending on usage and environmental factors, it’s advisable to inspect seals annually and consider replacing them every few years.
3. Can I install a garage door side seal myself?
Yes, with the right tools and guidance, many homeowners can handle the installation. However, if unsure, it’s best to consult a professional.
4. Are there different types of side seals for different climates?
Yes, some seals, like rubber, offer superior insulation against cold, while others, like brush seals, might be more suitable for dusty environments.
5. Can worn-out or damaged seals impact my energy bills?
Absolutely. Damaged seals can lead to drafts or gaps, causing heating or cooling systems to work harder and increase energy consumption.


